fredag 1. mars 2013

Quick start guide for Google Cloud Messaging

This is a guide for setting up a working Android push-messaging project. It uses the following dependencies:


Start by running the android-gcm-quickstart archetype:

 mvn archetype:generate -DarchetypeGroupId=de.akquinet.android.archetypes \   
 -DarchetypeArtifactId=android-gcm-quickstart -DarchetypeVersion=1.0.10-SNAPSHOT \   
 -DgroupId=my.project.package -DartifactId=my-project-name -DsenderId=[my-sender-id]  

Add you own project settings for groupId, artifactId and senderId. See the GCM getting started guide for information on how to get the senderId and apiKey: http://developer.android.com/google/gcm/gs.html


Configure the API Key, you can do this in three ways:


1. Add a property in the .m2/settings.xml file:


2. In the maven command, add a system property:
 gcmutils:run-server -DapiKey=  


3. Add the tag in the pom.xml (not recommended):
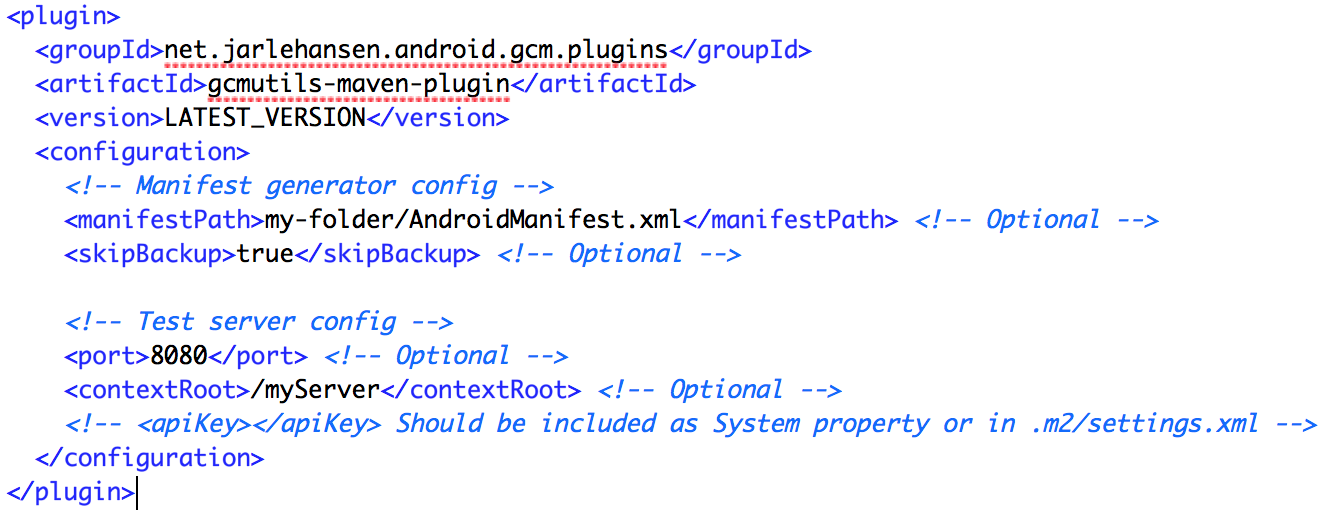


Start the test-server by running the following maven command:

 mvn gcmutils:run-server  

Open your browser on: http://localhost:9595
Start the main Android activity in the project and try to send a push message from the webpage to the connected device. By default the message should be shown by Logcat.


Now you hopefully have a working GCM project in Android!
For more detailed information, see the GCMUtils webpage

onsdag 20. februar 2013

GCMUtils - utility classes for Google Cloud Messaging

During Google IO 2012 Google updated their push messaging service (from C2DM), releasing Google Cloud Messaging. GCM includes features such as:
  • Ease of use, no sign-up forms
  • Battery efficiency
  • Statistics available through the Developer Console
  • Rich set of new APIs

While C2DM was a really cool technology, it was somewhat complicated to get implemented correctly. GCM have improved this by providing a much simpler API. Let me show a few examples.

These two lines of code provides verification for the device (that it supports push messaging) and the Manifest-file:
 GCMRegistrar.checkDevice(context);  
 GCMRegistrar.checkManifest(context);  

To get the registration id, code similar to this example can be used:
 String regId = GCMRegistrar.getRegistrationId(context);  
 if ("".equals(regId)) {   
   GCMRegistrar.register(context, SENDER_ID);   
 } else {   
   Log.i("Already registered, regId:" + regId);   
 }   

For more information, go to the official GCM page.

As shown above, the GCMRegistrar-class contains several useful methods. However, there are aspects that the standard GCM-library does not support.

GCMUtils (https://code.google.com/p/gcmutils)

This is why my new open source project, GCMUtils, was created. This library is a collection of helpful utility classes and methods, built on top of the standard GCM API. It is created to be used in combination with GCM.

It provides features such as:
  • Registration id handling 
 GCMUtils.getAndSendRegistrationId(this);  
  • Extended verification 
 GCMUtils.checkExtended(this);  
  • Simple configuration 
 # Required  
 receiver-url=  
 sender-id=  
 # optional  
 # values: enabled/disabled  
 check-extended=enabled  
  • Alternative base intent service with more functionality 
 public class GCMIntentService extends GCMUtilsBaseIntentService {  
  @Override  
  protected void onMessage(Context context, String msg) {  
   Log.i(TAG, "Message received: " + msg);  
  }  
  @Override  
  protected void onError(Context context, String error) {  
   Log.e(TAG, "onError: " + error);  
  }  
 }  

Adding it to your project is easy (copy 2 jar files) and it is created to make to development of GCM apps simpler and more efficient. In my own project this has been a big help, and hopefully this will be useful for others as well.

For more information, go to the features page and the quick start guide.

It is still early in the development of this project, so all feedback is appreciated. There are more features planned to get implemented before a final release is ready.

lørdag 26. februar 2011

protobuf-javame 1.1.0 released

Added support for using repeated (lists) on custom types. For more information go to the user documentation, Recursion section.

Project webpage: http://code.google.com/p/protobuf-javame/

lørdag 2. oktober 2010

Microlog4android, 1.0-version released

Try it out at: http://code.google.com/p/microlog4android/

Lots ideas, too little time, so we are also looking for developers to help us out.
If you are interested in open source and Android development please contact us (either Johan or me: hansjar at gmail dot com).

søndag 5. september 2010

protobuf-javame 1.0.0 released

Finally, 1.0.0 version of the protobuf-javame project is released.
The main features added in the new release are support for nested messages and enums.

Please try it out and let me know what you think :)
protobuf-javame

onsdag 2. juni 2010

Using Bluetooth and Microlog, updated

I previously described how to use the Bluetooth logging features (both appender and server) in Microlog with Ubuntu. There has been a few updates to Microlog that changes a few small details of this earlier blog post.

The following setup should now be used:
  1. The Ubuntu package “libbluetooth-dev still needs to be installed.
  2. Download bluecove jar files (use 2.1.1 snapshot and download both the standard jar and the gpl jar-file).
  3. Download the microlog distribution. The Bluetooth server is the file called microlog-server-bluetooth-{version}.jar. Put all the jar files in the same folder and create a start script.
  4. Create a startup script for the server. This updated script will use the new main class and does not have any hardcoded version numbers.
bluecove=$(ls bluecove-[0-9].*.jar)
bluecovegpl=$(ls bluecove-gpl-*.jar)
microlog
=$(ls microlog-server-bluetooth-*.jar)
echo
"The Microlog Bluetooth server loading: " $bluecove $bluecovegpl $microlog
gksu
"java -cp $bluecovegpl:$bluecove:$microlog net.sf.microlog.server.btspp.gui.MicrologBluetoothServerUI"


If you have any problems with this script please let me know!

søndag 14. februar 2010

How I use IntelliJ IDEA 9 and Gradle

The newest version of IntelliJ IDEA includes a few very nice gradle features, reference1 reference2 reference3.

Running gradle tasks works by simply opening the build.gradle file and pressing ctrl+shift+f10, this will run the tasks specified as "defaultTasks". If you want to run a specific task you just have to select it and press the same key combination. Nice!

I just wanted to share how I use a few other features as well. Many times I find myself wanting to use tasks that are not directly implemented in my own build script, but added by a plugin. One example is the "eclipse" plugin, since gradle does not (as of version 0.8) support the creation of IntelliJ IDEA project files. This is identified in the missing features section of the user guide:
  • Creating IDE project and classpath files for IntelliJ and NetBeans. Gradle supports IDE project file generation for Eclipse.
So, to be able to run these tasks I have created an "External tools" entry specifically for custom tasks. In IntelliJ open Settings -> External tools and press Add. Point to gradle_home in program. When you add $Prompt$ to Parameters this means you will get an input dialog when you run the task. In Working directory add $ProjectFileDir$, this will make sure it runs from your project directory.


When you run this task you will be able to enter a custom task, like "eclipse" or "-t" (list all available tasks). The tasks you enter here does not need to be specified in "defaultTasks" or directly in build.gradle.

If you use the gradle dependency management you can now easily generate the eclipse project files by running the "custom task" and entering eclipse. In IntelliJ IDEA you can then import these project files by pressing File -> Open Project... and selecting the newly generated eclipse .project-file. IntelliJ will then prompt for your input on how to import the project settings. I usually select Reimport -> Yes (you want to reuse the project files) -> This window.

You have now generated the project files with all dependencies from the build script. Be aware of one issue; make sure you check that the Modules -> Sources under Project Structure is correct. Sometimes it adds a few of the Test Source Folders under Source Folders. Just take a quick look and verify that everything looks correct.

Once you have done it a few times this process only takes a few seconds. Also it makes the build.gradle file the only place you need to keep track of your dependencies. I have been mixing project-local and repository dependencies in several of my own project, and this method works execellent when setting up your development environment.

Lets just hope the next gradle version includes an IntelliJ IDEA plugin...