Try it out at: http://code.google.com/p/microlog4android/
Lots ideas, too little time, so we are also looking for developers to help us out.
If you are interested in open source and Android development please contact us (either Johan or me: hansjar at gmail dot com).
lørdag 2. oktober 2010
søndag 5. september 2010
protobuf-javame 1.0.0 released
Finally, 1.0.0 version of the protobuf-javame project is released.
The main features added in the new release are support for nested messages and enums.
Please try it out and let me know what you think :)
protobuf-javame
The main features added in the new release are support for nested messages and enums.
Please try it out and let me know what you think :)
protobuf-javame
onsdag 2. juni 2010
Using Bluetooth and Microlog, updated
I previously described how to use the Bluetooth logging features (both appender and server) in Microlog with Ubuntu. There has been a few updates to Microlog that changes a few small details of this earlier blog post.
The following setup should now be used:
bluecovegpl=$(ls bluecove-gpl-*.jar)
microlog=$(ls microlog-server-bluetooth-*.jar)
echo "The Microlog Bluetooth server loading: " $bluecove $bluecovegpl $microlog
gksu "java -cp $bluecovegpl:$bluecove:$microlog net.sf.microlog.server.btspp.gui.MicrologBluetoothServerUI"
The following setup should now be used:
- The Ubuntu package “libbluetooth-dev” still needs to be installed.
- Download bluecove jar files (use 2.1.1 snapshot and download both the standard jar and the gpl jar-file).
- Download the microlog distribution. The Bluetooth server is the file called microlog-server-bluetooth-{version}.jar. Put all the jar files in the same folder and create a start script.
- Create a startup script for the server. This updated script will use the new main class and does not have any hardcoded version numbers.
bluecovegpl=$(ls bluecove-gpl-*.jar)
microlog=$(ls microlog-server-bluetooth-*.jar)
echo "The Microlog Bluetooth server loading: " $bluecove $bluecovegpl $microlog
gksu "java -cp $bluecovegpl:$bluecove:$microlog net.sf.microlog.server.btspp.gui.MicrologBluetoothServerUI"
If you have any problems with this script please let me know!
søndag 14. februar 2010
How I use IntelliJ IDEA 9 and Gradle
The newest version of IntelliJ IDEA includes a few very nice gradle features, reference1 reference2 reference3.
Running gradle tasks works by simply opening the build.gradle file and pressing ctrl+shift+f10, this will run the tasks specified as "defaultTasks". If you want to run a specific task you just have to select it and press the same key combination. Nice!
I just wanted to share how I use a few other features as well. Many times I find myself wanting to use tasks that are not directly implemented in my own build script, but added by a plugin. One example is the "eclipse" plugin, since gradle does not (as of version 0.8) support the creation of IntelliJ IDEA project files. This is identified in the missing features section of the user guide:
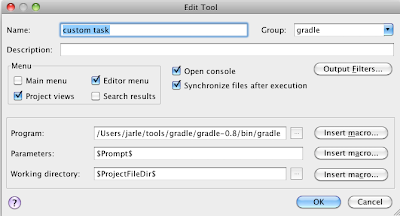
When you run this task you will be able to enter a custom task, like "eclipse" or "-t" (list all available tasks). The tasks you enter here does not need to be specified in "defaultTasks" or directly in build.gradle.
If you use the gradle dependency management you can now easily generate the eclipse project files by running the "custom task" and entering eclipse. In IntelliJ IDEA you can then import these project files by pressing File -> Open Project... and selecting the newly generated eclipse .project-file. IntelliJ will then prompt for your input on how to import the project settings. I usually select Reimport -> Yes (you want to reuse the project files) -> This window.
You have now generated the project files with all dependencies from the build script. Be aware of one issue; make sure you check that the Modules -> Sources under Project Structure is correct. Sometimes it adds a few of the Test Source Folders under Source Folders. Just take a quick look and verify that everything looks correct.
Once you have done it a few times this process only takes a few seconds. Also it makes the build.gradle file the only place you need to keep track of your dependencies. I have been mixing project-local and repository dependencies in several of my own project, and this method works execellent when setting up your development environment.
Lets just hope the next gradle version includes an IntelliJ IDEA plugin...
Running gradle tasks works by simply opening the build.gradle file and pressing ctrl+shift+f10, this will run the tasks specified as "defaultTasks". If you want to run a specific task you just have to select it and press the same key combination. Nice!
I just wanted to share how I use a few other features as well. Many times I find myself wanting to use tasks that are not directly implemented in my own build script, but added by a plugin. One example is the "eclipse" plugin, since gradle does not (as of version 0.8) support the creation of IntelliJ IDEA project files. This is identified in the missing features section of the user guide:
- Creating IDE project and classpath files for IntelliJ and NetBeans. Gradle supports IDE project file generation for Eclipse.

When you run this task you will be able to enter a custom task, like "eclipse" or "-t" (list all available tasks). The tasks you enter here does not need to be specified in "defaultTasks" or directly in build.gradle.
If you use the gradle dependency management you can now easily generate the eclipse project files by running the "custom task" and entering eclipse. In IntelliJ IDEA you can then import these project files by pressing File -> Open Project... and selecting the newly generated eclipse .project-file. IntelliJ will then prompt for your input on how to import the project settings. I usually select Reimport -> Yes (you want to reuse the project files) -> This window.
You have now generated the project files with all dependencies from the build script. Be aware of one issue; make sure you check that the Modules -> Sources under Project Structure is correct. Sometimes it adds a few of the Test Source Folders under Source Folders. Just take a quick look and verify that everything looks correct.
Once you have done it a few times this process only takes a few seconds. Also it makes the build.gradle file the only place you need to keep track of your dependencies. I have been mixing project-local and repository dependencies in several of my own project, and this method works execellent when setting up your development environment.
Lets just hope the next gradle version includes an IntelliJ IDEA plugin...
Abonner på:
Innlegg (Atom)